

Note: I am in no way affiliated with any products mentioned in this post, i have not received any financial reward, it is purely my opinion.
1. why is it a good idea to catalogue raw video footage?
To catalogue your raw video production footage in an easily accessible way can save you hundreds of hours of productivity over the course of a few years.
When it comes time to refresh that showreel or find specific shots a client is requesting, finding those specific shots from the last few years over a range of external hard drives can be painful and very time consuming. Having an organised footage library that has searchable keywords will make finding that shot much more manageable and claw back those valuable minutes in each day.
As a freelance DOP / camera operator, I produce hundreds of hours of raw footage over the course of a year. During my career, i have produced 1000’s of hours. From day one, my video footage has been slowly filling up external hard drives, sitting in the office collecting digital dust in the form of ones and zeros.
I have been fairly meticulous in my organisation of client projects, labelling the folders and sub folders in an identifiable way so that i can find them within a few minutes… Ok that was a bit of a white lie, sometimes i found them in a few minutes, but most of the time, finding a specific shot could take anywhere between 5 minutes to 2 hours – not ideal!
As time went by and more and more video projects were archived and backed up, the organisation was not what it was in those early years. So i decided to get on top of things and catalogue my raw video footage. I wanted to be able to do the following:
- Quickly find out where any shot or video project was
- Search all my external external hard drives in one search command
- Be able to search on either my main desktop editing Mac or on my MacBook Pro
- Be able to search when i'm anywhere in the world - even without an internet connection
-
Have (at least) a thumbnail image of every raw footage camera file shot for easy visual identifying.
2. Video catalogue app research
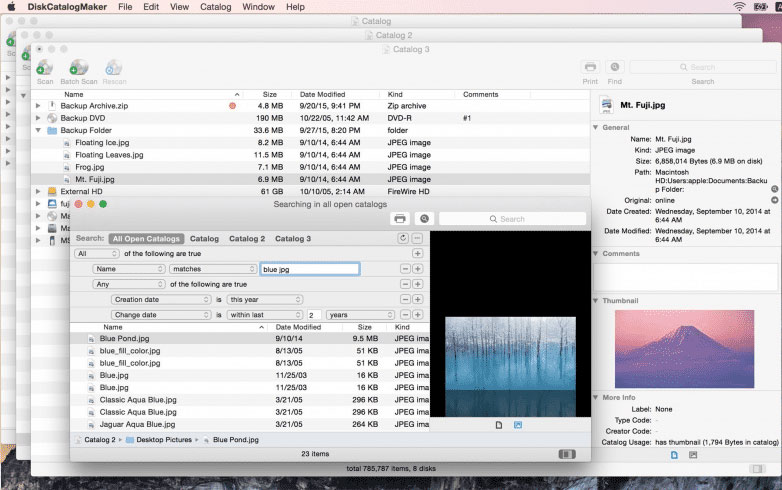
Finding a suitable app that was geared to video wasn’t as easy as i initially thought. There are quite a few apps out there that will scan the files on your external drives so that you can still search them even when the drive is offline. This is where i first started. Speaking to an editor friend, he recommended that i download Disk Catalog Maker.
After downloading, i scanned my 10 external hard drives and voila! I was able to search and see every video production project i had created content for over the past decade or so. I then copied the drive database that the catalog maker created and uploaded it to my google drive storage.
Now i can access all of my footage for reference purposes on my laptop or desktop. This definitely has some value and did save me a ton of time when i needed to access an archived project.
It still wasn’t 100% what i was looking for though, ideally i wanted to be able to see thumbnails of all of my footage and be able to search for specific shots via keywords.
I continued my search to find an app that would do just that, i spoke to a few industry friends and was finally pointed towards NeoFinder

3. how to catalogue your raw video production footage with neofinder
Just like the Disk Catalogue Maker app i mentioned above, NeoFinder scans all of your external hard drives (as well as your local drive if you want) and indexes them in a database. The free version allows you to catalogue up to 10 drives which is very good, if you need to catalogue more than 10, the paid version is around $40 which in my opinion, is worth the money.
Once you have downloaded and installed the app on your desktop or laptop (for reference, i used an Imac), I would recommend doing the following:
- Decide if you would like to sync the catalogues across your desktop and laptop via the cloud. If your answer is yes, before cataloging your first drive / volume, go to the NeoFinder preferences and change the database folder location to your cloud storage space such as Adobe Cloud, Google Drive, Dropbox etc.
- Make sure you have the necessary software on all your machines to read the raw footage of the camera you use.
NeoFinder will natively generate raw footage thumbnails on .mov, .mp4, .avi, .divx, .m4v, .qt, .flv, .mpg, .mkv, .dv, .wmv, .3gp, .webm, and .EyeTV file formats.
As i own a Sony FS7, i shoot primarily on .MXF format, i quickly realised that i needed to do some additional work to generate thumbnails. I downloaded the ffmpeg driver and pasted the file into the /Users/yourname/Library/Application Support/NeoFinder/ folder.
The next time i opened up the app, there it was, thumbnail images generated for Sony Raw Camera files in the MXF wrapping as well as MPG, M2V, M2TS, MPV, MTS, TS, WEBM, FLV, and even VOB.
Note: If you have r3d camera files from a RED camera, you will need to have REDCINE-X PRO Software installed on your machine to see thumbnails of your footage.

3. Cataloging your raw video footage
Once you have downloaded the app & installed the necessary drivers, it’s time to start cataloging your drives / volumes. to do this, go to File > New Catalog from Volume. Select the drive you want and click ‘start’.
Depending on how big your drive is, it can take a 20 minutes or so to catalogue raw video footage. My advice is to catalog all your drives first before starting to keyword the footage.
By default, NeoFinder will read all the files on the drives (including non video files) so a handy tip is to right click on the volume > find > All media files in this item.
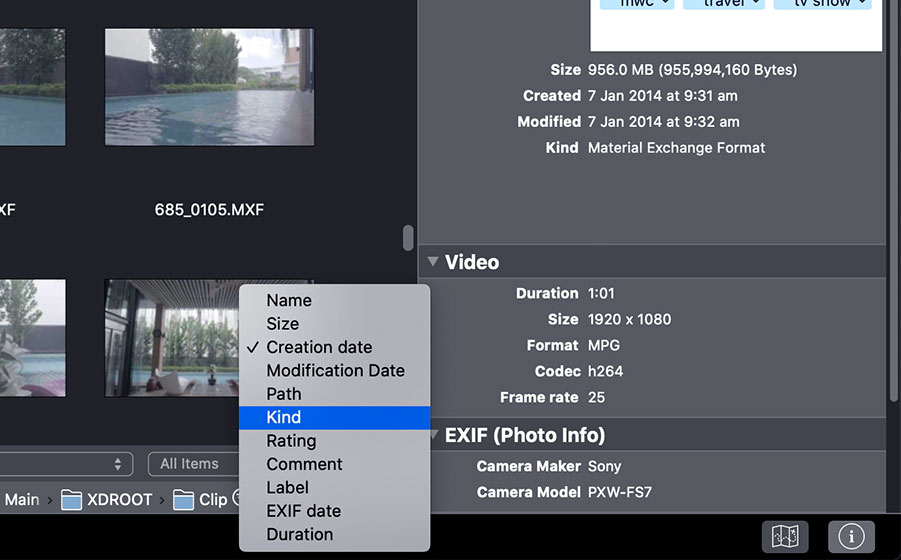
By now you should be able to see thumbnails of all your raw video footage in a list with thumbnails! Ahhh!
You can sort these by Name, Size, Creation Date, Modification Date, Path, Kind, Rating, Comment, Label, EXIF date or duration.
4. key-wording your raw video footage
Here comes the time consuming part: Key wording! I’m not going to lie, this took me a while! About 3 days in total as i had thousands of raw video footage to wade through. One important tip is you need to have the drive online and connected to NeoFinder to save keywords as these are appended to the file metadata itself, not the NeoFinder database.
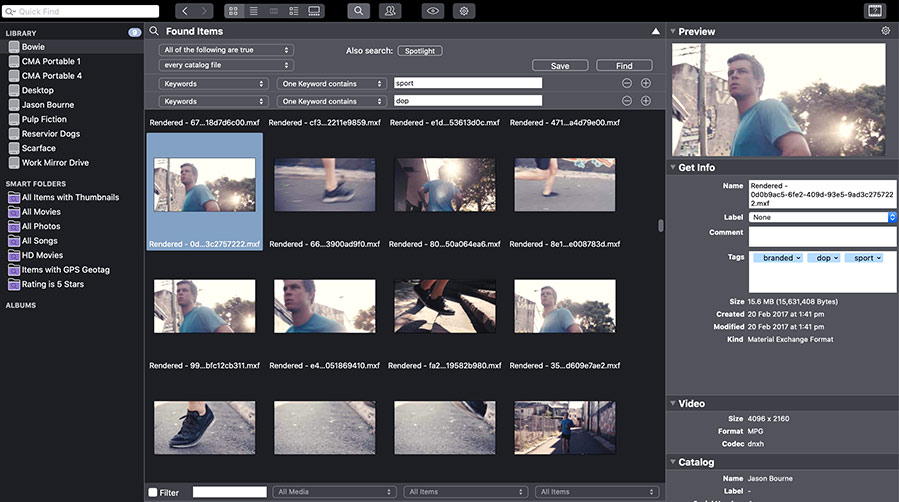
For key-wording your raw files, i recommend sorting by ‘creation date’ as i am generally shooting a similar genre / type of video on a specific day which makes it easier to bulk keyword. To enter keywords, click on the video file you want (or select multiple files) and type in the ‘Tags’ section of the ‘get info’ tab on the right hand side.
I key-worded my footage into various genres with the main idea of making the footage easily assessable when it comes to re-doing my showreel and making additional showreels such as drone, slow motion etc.
The keywords you use will probably be very different to mine but as a start, some words i used were ‘sport shoots’, ‘corporate video’, ‘branded content video’, ‘TV Series’ ‘TVC’s’, ‘Architecture’, ‘Automotive’ etc.
5. catalogue raw video footage - additional benefits
Find Duplicate Footage
I’m still exploring more feature as i use it but at the moment, the app is doing what i set out to achieve above. Another feature that i plan to use is ‘find duplicate footage’. This is great for making sure i don’t have triple and sometimes quadruple backup copies of old freelance projects.
Movie Contact Sheet
The movie contact sheet can generate more than one thumbnail for each video file. This is especially useful for longer clips. You can also generate added meta data. To generate a movie contact sheet, right click the file in NeoFinder or right click the file in Finder (on a mac).
Video Playback When Online
The heading pretty much explains this one itself, when the volume that the video file is stored on is online, you can play the video files from within NeoFinder. I probably won’t use this feature much but it’s good to know!
Advanced Raw Footage Search Of All Hard Drives
Once you have catalogued all your hard drives / volumes, you can quickly do advanced searches of all your video production footage such as Size, Duration, Keyword, Path, Video Codec, Image Codec, XMP & Name. These can also be combined. For example, search all travel (keyword) footage shot on .r3d file format.
5. conclusion
I’ve been meaning to catalogue my raw video footage for a long time and key-wording the files did take a bit of work (being able to bulk keyword did help a lot!) But now that it’s done i am already seeing the time saving benefits. In the coming months i plan to create mini genre based showreels and now that the ground work is done and the assets are organised, i will be able to find specific genre based shots in a flash. NeoFinder seems like a pretty powerful tool and i’m looking forward to trying out the more in-depth features.
Hire Paulfor your next video project
Paul and his team of trusted video crew are available for day rate hire or project rate hire in Adelaide at local rate, Australia wide or Global at very competitive rates.
Camera kits can be built for custom jobs. See full kit list here
Get in touch for availability and rates