5 Tips For Filming In Underground Mines

Filming In An Underground Mine

Filming Video Production in an underground mine

As a freelance camera operator / videographer I am fortunate to have experiences working in a wide variety of locations and industries. 

One day you might be filming a corporate interview in a clean office, the next day you might find yourself filming in underground mines, walking through thick mud, a kilometre under the surface. 

Variety is the spice of life as they say and it keeps me engaged with my career and loving my job.

For the latter example, filming in an underground mine, it’s a very unique experience that offers it’s own challenges and rewards.

I have shot promotional material, safety videos, interviews and even music videos underground in the past 10 years or so. Every single trip I go on, I learn something new on how to approach the assignment.

In this article I’ll be covering 5 tips on what I’ve learnt so far and how I prepare to go underground from kit selection, camera equipment preparation, pre production and what to expect when you go underground at a mine.  

Be prepared for the elements

Depending where you are in the world and what mine you are going to, make sure you pay a lot of attention to the elements. If you are someone who tends to feel the cold more than other people, pack for this, pack thermals to wear under the overalls you will likely be supplied.

I have only ever worked underground in Australia and the temperature underground varies drastically depending on how deep underground you are going to and what time of year.

For example, If we are going underground in South Australia in August to a shallow depth (usually where there will be installed ventilation), the air temperature can be quite cold (around 13 – 17 degrees).

If we are going deep underground to locations recently excavated parts of the mine in mid February then I will be prepared to sweat more then I ever have before! It get’s seriously hot and humid down there!

Packing water in your camera bag as well as snacks is highly recommended as you do not necessarily know when you’ll be in a position to have lunch or a snack break.

All of your PPE (personal protective equipment) is generally provided for you before you go underground but some items I recommend packing are:

  • Sunscreen – especially in summer in the desert
  • Large bin bags – stuff them in your camera bag. I’ll explain why further down in this article
  • Water
  • High energy snacks that won’t melt in the heat
Underground Mine
Descending down deep underground!!

The right tool for the job

Sony A7S3 Underground Mine
The Sony A7S3 in an underground mine.

The conditions underground can certainly put production equipment to the test. Depending on the type of mine (copper, coal, gold etc), there can be very fine dust in the air.

This fine dust can cause havoc with electronics and my main piece of advice with camera selection is to take a camera that isn’t running an internal fan or has an option to temporary disable the fan as this can suck in the dusty air and cause issues further down the track.

A few years ago, I shot some content underground with a Sony FS7 which was my main camera at the time. With the internal fans sucking in that fine dust all day I knew that it wasn’t a good idea. 

I eventually had the camera serviced and the technician did mention that there was quite a bit of orange dust build up on the fan. There are only a few places in the world where dust is bright orange! 


Sony A7S3 Mining Camera
A decent on board monitor is crucial for the A7S3

In early 2023, on my next project underground I decided to leave the Sony FX6 camera in the office and instead build a rig on the Sony A7S3 camera. The A7S3 offers somewhat more weather sealing is a safer bet to combat the conditions underground. 

It actually performed very well, the low light capabilities created fantastic pictures in the dark environment underground with minimal need for lighting each scene.

Another thing to consider is lens choices. Fast zoom lenses are what I tend to pick when preparing to go underground. My go to options are the 24-70mm f2.8 and the 70-200 f2.8. These two lenses provide a good range whilst staying fast for that low light. Changing lenses exposes the sensor to contaminants which you need to reduce as much as possible.

For supplementary equipment such as gimbals, monitors, and lighting, keep in mind that you’re probably going to spend at least half a day cleaning them after the shoot. I always budget professional cleaning of the equipment after the shoot.

If you use an Easyrig, bear in mind that it might be difficult to wear due to the various emergency gear you will have to wear on your belt such as respirators, lamp batteries etc. 

I did take my Easyrig underground once but never wore it. There was not enough space for the waist belt to fit.

One of the most important pieces of kit to consider is battery power. For the Sony A7S3 rig I created I made sure I can run the battery off the standard Sony batteries as well as the v-mount battery in a pinch. That way I was able to minimise changing batteries as well as not having to worry about battery management when we were underground.


Tip:

Take a few large bin bags in your camera bag when you go underground. These can be used to protect the camera when it’s in the (usually) dirty mining truck. 

Putting gaff tape on the feet of your tripod will also protect them from thick mud when underground.

Parework and insurance

Before entering the the mine boundary, make sure you double check that your public liability, personal injury and any other freelance videographer insurance you may have.

This is especially important if you’re planning on flying a drone close to the mine. A lot of standard drone flight public liability insurance does not cover you when flying within air space that is above a commercial mine.

Keeping in mind that there is usually a considerable amount of per production clearances and inductions that you will need to complete before the shoot. I normally budget at least 1 hour of ‘paperwork’ pre production for each shoot.

Ask in advance

dop specialised in underground mines
Filming in an underground mine

Building on what I mentioned above, make sure you ask questions in advance before prepping your gear.

Questions such as how deep underground you are going will give you an idea on the conditions you are likely going to be working in. Some other questions to ask would be:

  • Will be be filming in a new or old part of the mine?
  • Will there be spare seats in the mine truck for gear?
  • Is PPE provided?
  • How long will we be underground? (Think food and water)

Enjoy the experience

Enjoy the experience!

Filming underground in a mine is physical and often stressful work! But it’s important to live in the moment and enjoy the experience. 

You will be entering a very unique environment that fascinates me every time I film underground.

There is just something about physically touching the rock face almost a kilometre under the earth’s surface wondering when the last time this rock was on the surface. 

I hope this article has helped you gain an insight as to what to expect when it comes to working underground for the video production industry.

As a freelance camera operator / DOP, if you get the offer to film underground my advice would be to absolutely go for it, but make sure you are prepared!

Hire Paulfor your next video project

Paul is available for hire on a half day, day rate or per project basis in Adelaide, Australia wide or Global at very competitive rates.
Camera kits can be built for custom jobs. See full kit list here 
Get in touch for availability and rates

New Equipment including a Sony FX6 in Adelaide – Freelance DOP

Sony FX6 Adelaide

Updated D.O.P production kit - Sony FX6 in Adelaide

Every year since I first went freelance in 2011 I have kept up with new technology in the industry, the first camera I bought 12 years ago was the Sony A77 – really a nice little DSLR at the time, coming off the back of the Canon 5D revolution in the industry circa. 2010.

In 2013 my A camera was the Sony FS700 which brought HD slow motion to the forefront capable of shooting up to 240fps – very impressive at the time!

In 2018 I sold the FS700 and bought the FS7 which is still my C camera to this day. It still holds up for a third camera in well lit interviews or for locked off third camera shoots. 

In 2020 The A7S3 became my gimbal / A camera / B camera that I used to work in conjunction with the Sony FS7. The A7S3 quickly became my favourite tool to use – It’s nimble, a low light powerhouse, light enough to run on the gimbal and offers 4k 10-bit S-Log3 at up to 100fps.

Since the start of 2023 I have invested significantly into additional camera kit to continue to offer a range of options for producers and clients alike.

Below is a round up of all of the new kit that’s been added to my full kit which is included in my day rate in Adelaide and Australia wide. 

Sony FX6 cinema camera

Sony FX6 Adelaide

This Sony FX6 cine camera that has now become my A camera included in my day rate.

I have used this Sony FX6 in Adelaide on a few shoots in the past couple of months and I have been genuinely so impressed by what this camera is capable of! The high base ISO for low light conditions is incredible! 

This rounds out my current camera package setup:

Camera A: Sony FX6

Camera B: Sony A7S3

Camera C: Sony FS7

Sony Fx6 DOP Adelaide
Using the Sony FX6 on a recent shoot.

Portkeys 5″ On Camera Monitor

After a bit of research I decided to go with the Portkeys! Mainly for two reasons, it’s very bright in outdoor environments. Being based in South Australia means I do a lot of work in harsh conditions during summer so having a bright outdoor monitor was crucial.

I have been using this monitor either as an onboard camera monitor, gimbal monitor or a client / director monitor depending on the specific job.

Another reason I decided to buy the Portkeys was due to the fact it has bluetooth camera control. This means I can control the A7S3 on the gimbal via the monitor without needing to touch the camera! It was quiet a weird feeling the first time I did this but it’s been great to not have remote control. It also opens up options for controlling the camera in more niche projects where the camera is out of reach etc.

Accsoon CineView HE Wireless Transmission

Accsoon cine HE

For the past few years, I have been using a DIY wireless directors monitor. While this has worked very well for me, I decided to buy a setup that is a little more plug and play but also has a few more features built in to keep up with the current trends of remote producing.

Recently, I had a shoot to conduct a remote interview with the Sony FX6 in Adelaide while the producer was in Singapore. We used a laptop next to the camera for the producer to ask questions via google meet. It worked well and thats nothing new. 

Using the Accsoon CineView HE Wireless Tx/Rx I had a live view from the FX6 going into the transmitter. The receiver was plugged into my SmallHD 7″ monitor via HDMI but also, using the built in USB output on the receiver I plugged it into second laptop and joined the google meet call. This enabled the producer to have two feeds from the set.

When it came to shoot b-roll, I put the transmitter onto the gimbal with the A7S3 and had a live view from the gimbal beaming up to Singapore. For comms, I called the producer via WhatsApp and wore my Airpods.

It worked a charm! A live link from the gimbal to anywhere in the world with comms to the producer sitting in their office thousands of miles away!

This transmitter / receiver unit works at up to 365m away (line of sight), has up to 4 receiving options such as tablet, phone, receiver etc.

If you’re a director, producer or client on set, I can provide a live view in 1080p HD on either the main camera, off the shoulder, tripod, gimbal or hand held.

Light Modifiers

Mathews 40 x 40 floppy cutter
Matthews 40 x 40 floppy cutter

Some would say spending thousand of dollars of pieces of fabric isn’t the best use of budget! I am so happy these are now a part of my kit.

Being able to manipulate light, block it, diffuse it and shape it has been such a great investment.

I’m often filming interviews in offices and corporate spaces with over head spot lights and fluorescent lighting where colour balance is all over the place. Having these modifiers sitting in the production van enables me to block any overhead lights from faces, reduce light coming in from windows and also reduce sunlight by 1.5 stops when conducting interviews outside.

All of the modifiers are from the Matthews brand which I imported from the USA. Matthews equipment have been a staple on Hollywood sets for decades.

Overall, one of the most basic yet favourite purchases of my career!

Lens

Sony 24-70mm f2.8 mk2
Sony 24-70 f2.8 mk2
Sony 70-200mm f2.8 mk2

To round off this latest update to dop production kit, I have also invested in some nice zoom glass. Having a zoom range from 24 – 200mm at f2.8 combined with the incredible low light performance of the A7S3 and the FX6 means that low light shooting isn’t as restrictive as it once was!

One of my favourite setups when covering live events or run and gun is using the A7S3 on the gimbal with the 24-70 2.8 and using the 70-200mm on the Sony FX6 in Adelaide. Using this combination I can cover (almost) any scenario and get a wide range of different shots. 

If I need to be ultra wide establishing shots, I’ll pop the 12-24mm on the FX6 which takes less than a minute.

Both of these lenses are ‘Mark 2’ from sony, they are lighter, have manual aperture rings and and super sharp even at the edges of the frame.

Post Production Updates

Mac Studio M1 Max

On the post production side of things, my current edit suite is a Mac Studio M1 Max. 

I have been editing off this machine for close to a year now and it hasn’t skipped a beat which is what you’d expect from a mac of this spec.

I have had 3 x streams of 4k .MXF video files in a multi-cam edit perform without any buffering or issues (using an external SSD). 

It’s enabled me to edit as fast and efficiently as possible. No complaints!


Hire Paulfor your next video project

Paul is available for hire on a half day, day rate or per project basis in Adelaide, Australia wide or Global at very competitive rates.
Camera kits can be built for custom jobs. See full kit list here 
Get in touch for availability and rates

Lot’s of new gear! CMA Media Video Equipment Update

New Video Production Camera Equipment.

Over the past few months we have took the plunge on some shiny new video equipment that is helping us to capture some stunning images as well as make certain types of projects easier and time efficient. From cameras to monitors to iphones, here is a list of some of the new production gear that we now have in-house. 

Sony A7S3 Mirrorless Camera

Well it was a long time coming and I couldn’t be happier with this camera. Using it over the past few months has been a dream, incredible stabilised 4k 60p video when used in conjunction with the DJI RS2 Gimbal. Filming 2 camera interviews has been fantastic as the picture profile, sensor and 4k image creates a very close match with the Sony FS7 camera

Using the Sony A7S3 on location
Using the A7S3 underground at a recent shoot.

DJI RS2 Gimbal

Back in 2013 I bought the Glidecam HD4000, it was my first foray into using camera stabilisers and it definitely brought a lot of value to productions i was working on. Flying that with the old FS700 with the vest and arms was, (although a pain to balance and ‘suit up’) a joy to use. It brought silky smooth pictures and i had a lot of fun learning how to fly a Steadi-cam. I used this setup on the Dubai Travel Series I shot back in 2016.

I ended up selling the Glidecam in 2018 as I hadn’t used it for a while and was doing more directing work. In May 2020 I bought the DJI Ronin-s, it was a whole new world to learn. I struggled a bit a first to remove micro shakes in the pictures and master smooth gimbal shots. The Gimbal itself was well made and enabled me to quickly get smooth walking shots and walk-throughs. 

It was slightly annoying how I needed to re-balance the gimbal every-time I used it and when changing locations on shoots throughout the day i did find myself strapping the Gimbal into the passenger seat of the car so i didn’t have to re-balance at the next location. Not ideal as it bashed up the equipment a bit (and probably wasn’t super safe either!).

2 months ago I sold the original DJI Ronin-s and bought the updated version, the DJI RS2. After using it for a few months, I can honestly say it’s a very good upgrade, the steadiness of the pictures coming off this Gimbal are amazing, it’s lighter than the original and I don’t need to re-balance every time i get to a new location. 

I have been flying the A7S3 on this gimbal, and when paired with the 4k 60p images in the s-cinetone colour science. It’s just been an absolute joy to use! I recently used this new video equipment combo when creating a quick social video for Anytime Fitness

OneTake Only Teleprompter / Autocue video equipment

Teleprompter Hire Adelaide

With the events of 2020, the way video was produced around the world changed. Remote interviews became more popular than ever as well as live streaming due to the need for social distancing.

I have completed many projects of the last year that involved talking to camera such as community announcements, CEO announcements and Zoom ‘look-a-like’ calls where the person is looking down the lens like in a Zoom call but the camera on the other end is a professional video camera instead of a desktop camera.

After renting teleprompters for specific projects over the years, it was finally time to purchase a teleprompter / autocue for in-house use.

Dual client monitor setup with Ipad / Phone & Monitor

Two Camera Client Monitor
Dual camera directors monitor on a recent shoot

I have been providing a client / directors monitor for setups for a while now and i have found it’s been a great asset to have on set. The (minor) problem I had was when doing multi-camera setups in a studio or an on location interview, I was only able to give a live feed from the A camera to the client or director. 

I decided to create a rig where i was able to provide 2 streams (or 3 if necessary) to the client / director. It needed to do two things: 

  1. Both screens needed to be on one rig / cage for ease of setup and keeping as light a footprint as possible.
  2. Modular so that when the monitors are not sitting on a light stand in a controlled interview situation, they can be moved around or held by the director in his / her hand around the set.
Testing a dual camera directors monitor with a SmallHD 702 bright and an Ipad

I bought an Ipad tripod mount and an Iphone mount and hooked them onto a Noga Arm. I tested out the idea on an interview shoot a few weeks ago and it actually worked quite well! 

Two live camera feeds wirelessly to two monitors. The A cam was using a wireless HDMI transmitter and receiver using the system I built last year and the B Cam (Sony A7s3) was using it’s built in Wifi to send the video feed to the Ipad / Iphone.

Hire Paulfor your next video project

Paul and his team of trusted video crew are available for day rate hire or project rate hire in Adelaide at local rate, Australia wide or Global at very competitive rates.
Camera kits can be built for custom jobs. See full kit list here 
Get in touch for availability and rates

Sony confirms the A7s iii will arrive ‘later this summer’

Sony A7s iii coming soon

Will the sony A7s iii arrive soon?

I’m not usually one to write about rumours and upcoming releases but the possible release of a Sony A7s iii i admit i am a bit excited about. VP and Senior General Manager of Sony’s Digital Imaging Group, Kenji Tanaka revealed this week in an interview with DPReview that finally the successor to the ageing Sony A7s ii will be coming ‘later this summer’ (or Winter) if you live down here in the southern hemisphere.

This is a pretty solid confirmation from Sony and that we will see a new camera from the A7s line in the coming months. The jury is still out as to what the specs maybe but Tanaka did promise that the camera will have ‘supreme’ performance and a completely redesigned camera.

“I can confirm that a successor to the Alpha 7S II will be coming, later this summer. Right now we’re focused on the launch of the new camera, and it will be a complete redesign of the whole system, including the image sensor. Everything is new. We hope it will meet and exceed the expectations and requests of our customers. I’m very confident that our new model will meet their demands.” – Kenji Tanaka

the specs would i like to see on the a7s iii

4k with a 60p frame rate

Recently i’ve been filming a fair bit of architecture content on the main camera (Sony FS7) on 4k / 25 & 60p and then using a Ronin S Gimbal for a bit of b-roll of the presenters walking around etc. So, (and i know this is a bit predictable) the first thing on my list would be 4k/60p to match the tripod based b-roll i shoot on the FS7. Being able to shoot 4k/60p on the Gimbal with the A7s iii would be fantastic with matching the aesthetic.

3 recording streams

Using a b-cam like the A7s iii on a gimbal would be great. But having a wireless signal from the gimbal to a directors monitor / client monitor is currently not possible with the A7s ii as the camera can only output 2 video streams:

  • 1 stream to the card for recording
  • 1 stream to the viewfinder on the camera (for operator viewing) 

If the new A7s iii has 3 recording streams built in, i could then have:

  • 1 stream to the card for operator viewing
  • 1 stream to the viewfinder so i can shoot on the gimbal
  • 1 stream to HDMI output for wireless signal to the monitor receiver.

 This would be great! I’m not holding my breathe for this capability, but i would be very satisfied if it could!

*Note if you have found a way to do this, leave a comment below!

10-bit 4:2:2 recording

Same reasons as the above, having 10-bit on my b-cam DSLR would mean an exact specs match on the main camera. I would also feel a lot more comfortable when directors / clients ask me to shoot in S-log. Shooting s-log on an 8-bit b-cam is always a little risky in harsh or low lighting conditions in my opinion.

Recap & ‘nice to have’

No 30 minute recording limit

This would be useful for shooting 2 camera interviews and not having to cut recording half way through the interview. Murphy’s law is at 29 minutes and 40 seconds the subject is always in the middle of a great sentence or statement! Having this be a thing of the past would be great.

Other specs and ‘nice to have’ specs

What specs would you like to see in the new Sony A7s iii? Leave your thoughts in the comments below.

Hire Paulfor your next video project

Paul and his team of trusted video crew are available for day rate hire or project rate hire in Adelaide at local rate, Australia wide or Global at very competitive rates.
Camera kits can be built for custom jobs. See full kit list here 
Get in touch for availability and rates

How to catalogue all your raw video footage for offline access

Video_Production_backupsv3

Note: I am in no way affiliated with any products mentioned in this post, i have not received any financial reward, it is purely my opinion.

1. why is it a good idea to catalogue raw video footage?

To catalogue your raw video production footage in an easily accessible way can save you hundreds of hours of productivity over the course of a few years. 

When it comes time to refresh that showreel or find specific shots a client is requesting, finding those specific shots from the last few years over a range of external hard drives can be painful and very time consuming. Having an organised footage library that has searchable keywords will make finding that shot much more manageable and claw back those valuable minutes in each day.   

As a freelance DOP / camera operator, I produce hundreds of hours of raw footage over the course of a year. During my career, i have produced 1000’s of hours. From day one, my video footage has been slowly filling up external hard drives, sitting in the office collecting digital dust in the form of ones and zeros. 

I have been fairly meticulous in my organisation of client projects, labelling the folders and sub folders in an identifiable way so that i can find them within a few minutes… Ok that was a bit of a white lie, sometimes i found them in a few minutes, but most of the time, finding a specific shot could take anywhere between 5 minutes to 2 hours – not ideal!

As time went by and more and more video projects were archived and backed up, the organisation was not what it was in those early years. So i decided to get on top of things and catalogue my raw video footage. I wanted to be able to do the following:

2. Video catalogue app research

Finding a suitable app that was geared to video wasn’t as easy as i initially thought. There are quite a few apps out there that will scan the files on your external drives so that you can still search them even when the drive is offline. This is where i first started. Speaking to an editor friend, he recommended that i download Disk Catalog Maker

After downloading, i scanned my 10 external hard drives and voila! I was able to search and see every video production project i had created content for over the past decade or so. I then copied the drive database that the catalog maker created and uploaded it to my google drive storage. 

Now i can access all of my footage for reference purposes on my laptop or desktop. This definitely has some value and did save me a ton of time when i needed to access an archived project.

It still wasn’t 100% what i was looking for though, ideally i wanted to be able to see thumbnails of all of my footage and be able to search for specific shots via keywords.

I continued my search to find an app that would do just that, i spoke to a few industry friends and was finally pointed towards NeoFinder

diskcatalogmaker
Disk Catalog maker is great for viewing what files are on your external hard drives when they are offline

3. how to catalogue your raw video production footage with neofinder

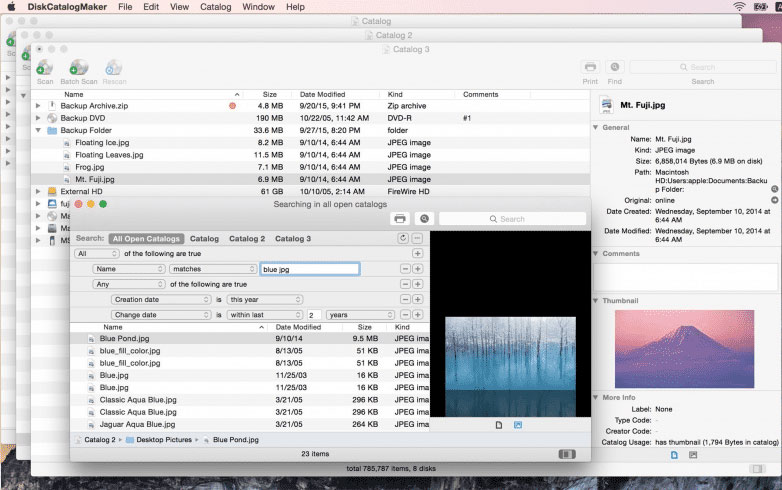
Just like the Disk Catalogue Maker app i mentioned above, NeoFinder scans all of your external hard drives (as well as your local drive if you want) and indexes them in a database. The free version allows you to catalogue up to 10 drives which is very good, if you need to catalogue more than 10, the paid version is around $40 which in my opinion, is worth the money.

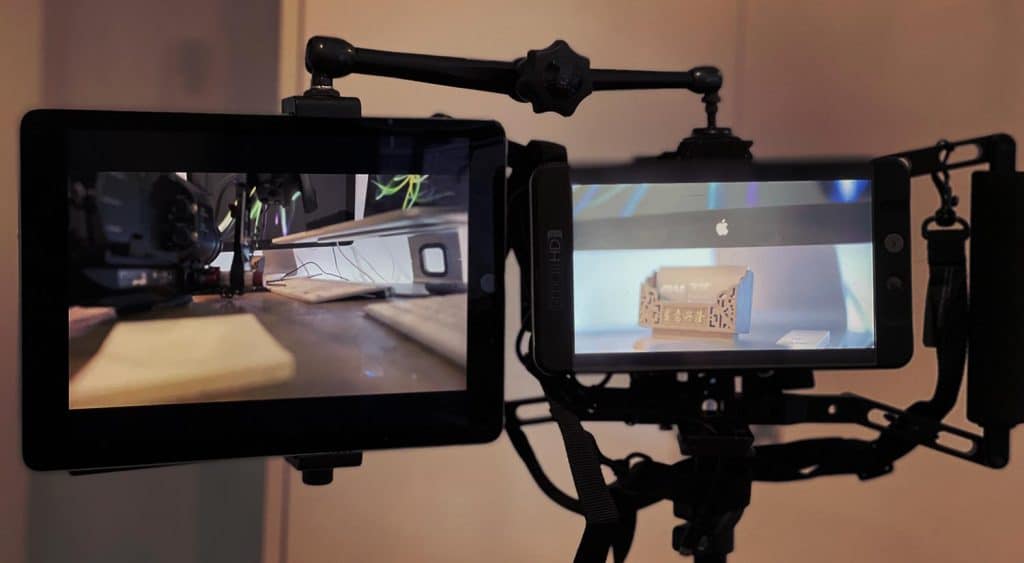
Once you have downloaded and installed the app on your desktop or laptop (for reference, i used an Imac), I would recommend doing the following:

  • Decide if you would like to sync the catalogues across your desktop and laptop via the cloud. If your answer is yes, before cataloging your first drive / volume, go to the NeoFinder preferences and change the database folder location to your cloud storage space such as Adobe Cloud, Google Drive, Dropbox etc.
  • Make sure you have the necessary software on all your machines to read the raw footage of the camera you use. 

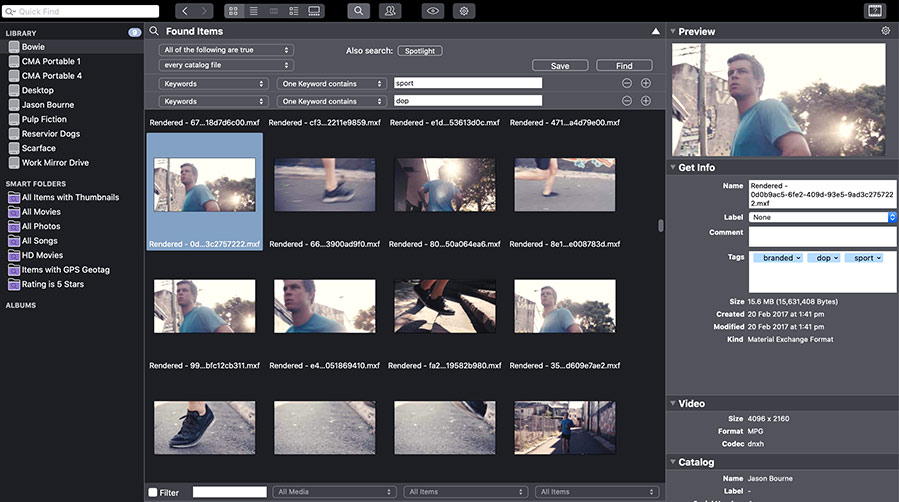
NeoFinder will natively generate raw footage thumbnails on .mov, .mp4, .avi, .divx, .m4v, .qt, .flv, .mpg, .mkv, .dv, .wmv, .3gp, .webm, and .EyeTV file formats. 

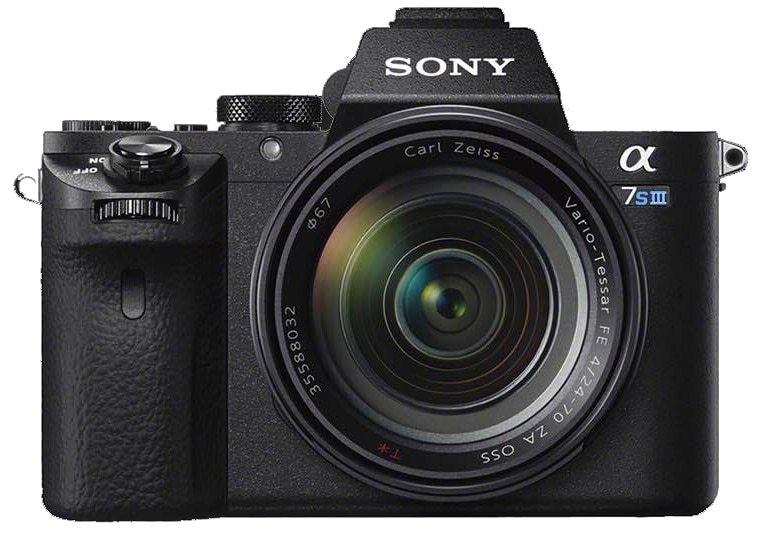
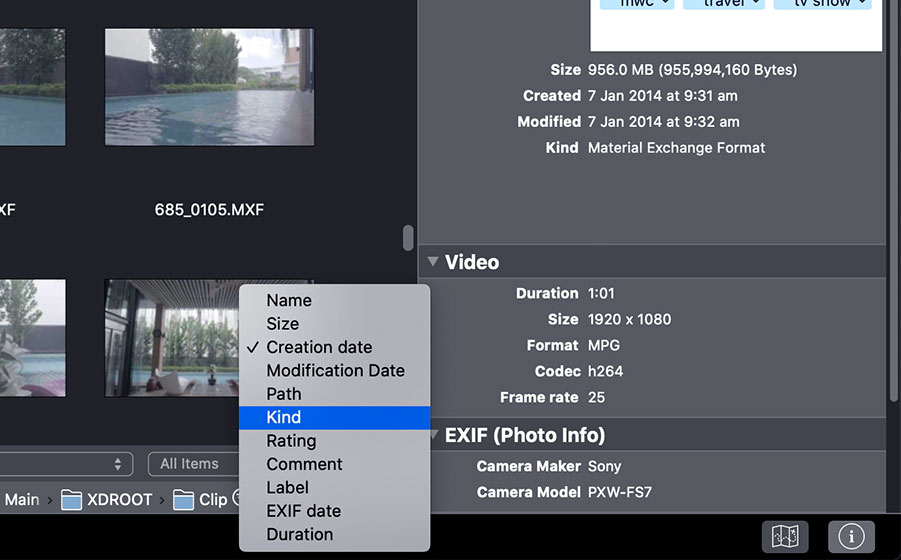
As i own a Sony FS7, i shoot primarily on .MXF format, i quickly realised that i needed to do some additional work to generate thumbnails. I downloaded the ffmpeg driver and pasted the file into the /Users/yourname/Library/Application Support/NeoFinder/ folder. 

The next time i opened up the app, there it was, thumbnail images generated for Sony Raw Camera files in the MXF wrapping as well as MPG, M2V, M2TS, MPV, MTS, TS, WEBM, FLV, and even VOB.

Note: If you have r3d camera files from a RED camera, you will need to have REDCINE-X PRO Software installed on your machine to see thumbnails of your footage.

NeoFinder_Camer_footage_thumbnail
The NeoFinder interface displaying raw FS7 footage thumbnails after installing ffmpeg

3. Cataloging your raw video footage

Once you have downloaded the app & installed the necessary drivers, it’s time to start cataloging your drives / volumes. to do this, go to File > New Catalog from Volume. Select the drive you want and click ‘start’.

Depending on how big your drive is, it can take a 20 minutes or so to catalogue raw video footage. My advice is to catalog all your drives first before starting to keyword the footage.

By default, NeoFinder will read all the files on the drives (including non video files) so a handy tip is to right click on the volume > find > All media files in this item. 

By now you should be able to see thumbnails of all your raw video footage in a list with thumbnails! Ahhh! 

You can sort these by Name, Size, Creation Date, Modification Date, Path, Kind, Rating, Comment, Label, EXIF date or duration. 

NeoFinder_Sort_by_creation_date
You can sort your footage with a range of options.

4. key-wording your raw video footage

Here comes the time consuming part: Key wording! I’m not going to lie, this took me a while! About 3 days in total as i had thousands of raw video footage to wade through. One important tip is you need to have the drive online and connected to NeoFinder to save keywords as these are appended to the file metadata itself, not the NeoFinder database.

For key-wording your raw files, i recommend sorting by ‘creation date’ as i am generally shooting a similar genre / type of video on a specific day which makes it easier to bulk keyword. To enter keywords, click on the video file you want (or select multiple files) and type in the ‘Tags’ section of the ‘get info’ tab on the right hand side.

I key-worded my footage into various genres with the main idea of making the footage easily assessable when it comes to re-doing my showreel and making additional showreels such as drone, slow motion etc.

The keywords you use will probably be very different to mine but as a start, some words i used were ‘sport shoots’, ‘corporate video’, ‘branded content video’, ‘TV Series’ ‘TVC’s’, ‘Architecture’, ‘Automotive’ etc. 

NeoFinder_Raw_footage_keyword
You can enter keywords / tags in bulk by selecting multiple clips

5. catalogue raw video footage - additional benefits

Find Duplicate Footage

I’m still exploring more feature as i use it but at the moment, the app is doing what i set out to achieve above. Another feature that i plan to use is ‘find duplicate footage’. This is great for making sure i don’t have triple and sometimes quadruple backup copies of old freelance projects. 

Movie Contact Sheet

The movie contact sheet can generate more than one thumbnail for each video file. This is especially useful for longer clips. You can also generate added meta data. To generate a movie contact sheet, right click the file in NeoFinder or right click the file in Finder (on a mac).

Video Playback When Online

The heading pretty much explains this one itself, when the volume that the video file is stored on is online, you can play the video files from within NeoFinder. I probably won’t use this feature much but it’s good to know!

Advanced Raw Footage Search Of All Hard Drives

Once you have catalogued all your hard drives / volumes, you can quickly do advanced searches of all your video production footage such as Size, Duration, Keyword, Path, Video Codec, Image Codec, XMP & Name. These can also be combined. For example, search all travel (keyword) footage shot on .r3d file format.  

5. conclusion

I’ve been meaning to catalogue my raw video footage for a long time and key-wording the files did take a bit of work (being able to bulk keyword did help a lot!) But now that it’s done i am already seeing the time saving benefits. In the coming months i plan to create mini genre based showreels and now that the ground work is done and the assets are organised, i will be able to find specific genre based shots in a flash. NeoFinder seems like a pretty powerful tool and i’m looking forward to trying out the more in-depth features. 

Hire Paulfor your next video project

Paul and his team of trusted video crew are available for day rate hire or project rate hire in Adelaide at local rate, Australia wide or Global at very competitive rates.
Camera kits can be built for custom jobs. See full kit list here 
Get in touch for availability and rates

Videographers: 5 ways to stay productive when video work is quiet

Videographer stay productive

When work dries up, how do you stay productive as a videographer?

Making sure you stay productive as a videographer is paramount to keeping motivation and hunger up for the next gig. 

The nature of running a small business or being a freelancer in the media industry naturally means that work will tend to ebb and flow. One minute you don’t have enough minutes in the day to finish that edit, plan the next shoot or make sure all those batteries are charged. 

Then, before you know it, there can be times where you have a quiet spell and you’re wondering ‘what do i do now’? Well, hopefully these 5 tips will help to make sure you stay productive as a videographer so then when things do get crazy again, you’re ready for it!


1. Create a new showreel / specific GENRE BASED showreels.

Not updating our showreel as much as we should, we are all guilty of it! When things get busy, updating the showreel is often cast back to the bottom of the priorities list and before you know it, it’s been 6 months, a year or maybe more since one of your most important advertising vehicles is out of date and in need of some love.

When you have a few days off, gathering some of the best footage from recent production shoots together and adding them to your showreel can not only remind you of what you’ve actually been doing recently but help freshen up your reel and keep things interesting. If you have even more free time, editing together some specific genre based showreels can be a great way to showcase any specialities you might have as a videographer. For example, you can create a drone showreel, a slow motion, time-lapse, architecture, sport or corporate video production specific showreel. Then when you get that video enquiry for that amazing landscape drone job around your area, you can fire off a specific reel that will go a long way in assuring the client you know what you’re doing.

premiere pro editing
Line up some of your favourite snacks or a few glasses of wine and smash out a new showreel!

2. Network in real life / get in touch with past clients

I can see all the introverts reading this one and hitting the scroll button to the next tip, but networking in real life should not be ignored – it’s easily one of the most beneficial ways to land new work. 

Always have a few business cards on you, you never know who you are going to meet! Some of my most valuable clients i have met in the most random of places or circumstances. Maybe your local camera equipment hire house is having a networking evening to showcase a new piece of kit for example, i have found this a great place to meet fellow industry people and collaboration opportunities.

Another way to keep busy when you’re quiet is to send a friendly email to your past clients or enquiries. I recommend having a fairly legitimate reason for getting in touch. For example, you could let them know you have a new showreel to check out, a new piece of equipment or package deal etc. Make it brief with a call to action.

freelancer in a cafe
Get yourself your favourite hot drink and write down a list of past clients to get in touch with

4. give your freelance business a financial audit

Not the most interesting thing to do on a Monday morning i know! But keeping in touch of where you are at with your finances and business as a whole can create a fantastic sense of clarity both on paper and in your head day to day which results in less stress levels and a good sense of where you are at.

Giving your video production or freelance crew business an audit can involve a number of different tasks depending on your specific position. If you’re just starting out this could mean setting up some accounting software or researching if your current rates reflect your experience and equipment you are including. 

If you are more established, setting up income and spending categories so at the end of each year you know what you’re spending too much on & whats earning you the most money can help give you a clear idea of what you could be working on. One important financial part of freelance life i never look forward to is reconciliation of spending account for GST purposes, I need to lodge my GST in Australia every 3 months so whenever i have a spare day i keep on top of my reconciliation so i don’t have a giant list of receipts to go through when GST is due.

For more in-depth tips on freelance accounting see my article 7 accounting tips I wish I knew when I turned freelance

4. work on a passion project

In my opinion, being a freelance videographer, getting paid to make videos is an amazing way to make a living. 

Seeing clients genuinely happy on set is a great feeling. But every now and then, nothing beats working on your own project, with no-one to answer to, no client or producer brief to follow. Just coming up with an idea for a short film, a documentary or experimental video and getting lost in the process of script writing, scene selection and planning is a great way to stretch your creativity and skills. 

It’s an opportunity to try something new, something you have be wanting to learn and master that you’ve been too nervous to try on a paid job. Having a week or so with no client work is a great opportunity to get out there and see what you can create! 

A few years ago, i was doing a lot of sport related video content, i always wanted to shoot a promo video in a dark gym with only one key light but the style never quite suited the brand i was shooting for at the time. This was a perfect excuse for a passion project to a) see what a dark gym / one key light would look like and b) to make any mistakes so that when the time came for a paid job with this style, i had an idea of what to look out for. My test / passion project video “Ring Masters” is below

Play Video

5. Walk away from work / pick up a new hobby

They say a change is as good as a holiday, if you’ve been burning the midnight oil lately with work and late night editing, having a complete break from all things work and video production can be a great idea. 

Take a mini ‘staycation’ if you can’t leave your town due to other commitments, work on a project around the house or pick up a new sport or hobby for a few days or a week. Having a mental break can result in coming back to freelance life a week later feeling refreshed and ready to stay productive as a videographer & maybe get stuck into a few of the ideas i’ve raised above! If you have the funds and capability, go on a short break away and enjoy the finer things in life!

6. (Bonus idea) sell old video production gear

If you’re like me, when you started out, your equipment took up a few shelves in the wardrobe, then it migrated to 1/2 of the wardrobe, then all of the spare room and before i knew it, i had gear everywhere all over the house! Selling old gear that you no longer use takes a bit of a push as you may always have that little voice in your head saying ‘what if i’ll need it again one day’. While this may be true you have to ask yourself if it’s financially viable. 

If you have a piece of equipment worth $1,500 that you use twice a year, are you better to sell it for $1500 & hire it twice a year from a rental house for $90 per hire? With technology advancing so rapidly it may be financially better to sell rarely used or old production gear sooner rather than later while you still can.

Selling that old vision switcher or old workhorse camera can free up some much needed storage space in the office or house as well! Some places to sell old gear include:

Sell old camera gear
I recently said goodbye to my steadicam setup and sold it onto someone who will make more use out of it

Hire Paulfor your next video project

Paul and his team of trusted video crew are available for day rate hire or project rate hire in Adelaide at local rate, Australia wide or Global at very competitive rates.
Camera kits can be built for custom jobs. See full kit list here 
Get in touch for availability and rates